Science with Kids: Ecosystem in Miniature, Part 1
What do a soda bottle and science have in common?
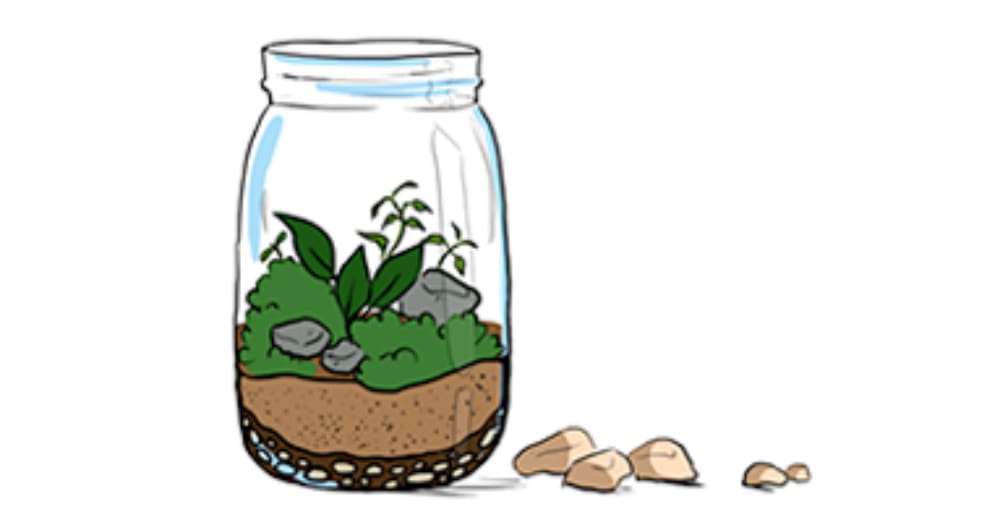
Of course, the answer can be: soda bottles are made from polyethylene terephthalate, which sounds very scientific. But we do not mean this. A soda bottle combined with simple tools and a handful of dirt can turn into a wonderful way of exploring the world with your kids - a real ecosystem in miniature! Just add water!
Water Cycle Basics
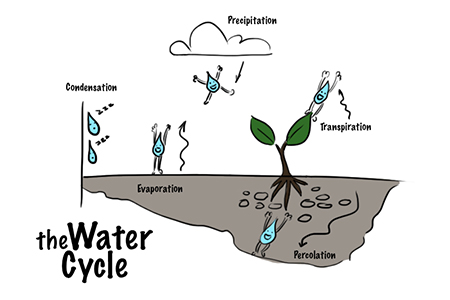
Water is the omnipresent essence of life. It is part of our bodies; it runs in the soil evaporates into the atmosphere and falls from the sky. The movement of water between land-atmosphere and ocean is known as the water cycle. Your kids may know the theory but you can give them a chance to observe the water cycle in miniature. This article gives the detailed plan of how you can make an ecosystem in a bottle and help your little ones explore the link between air, soil, and water on a miniature model.
Fixing the Ecosystem
First of all, you will need 2 2-liter soda bottles with caps.
Choose Bottle
Bottles come in different sizes and shapes; even if they are visually the same their bodies can have a 1 or 2 mm difference and this tiny mismatch can prevent you from constructing a neat ecosystem. Find bottles that used to contain the same brand of beverage. Choose bottles that have no creases or dents - damaged containers are not durable.
You Will Also Need
- A hairdryer
- Vegetable oil
- Scissors
- Erasable felt-tip pens
- A thick needle (a pin or a nail)
- Woodworking awl
- Tapered reamer
- Cotton string
- Water
- Soil
- Seeds
- And a little patience
Step by Step
Remove Labels
Turn the hair dryer on low. Be careful: if the air is too hot, the bottle will warp! Hold the bottle 5 inches away from the nozzle and sway the bottle up and down to let the warm air melt the heat-sensitive glue below the label. Remove the label gently. If parts of the glue are still on, rub a little vegetable oil on the glue traces and they will ball up. Go on rubbing till you remove all the glue. Wash the bottles with warm water and soap.
Cut Bottles
First, mark lines with an erasable felt-tip pen: 1/2 inch below the hip on one bottle and 1/2 inch below the shoulder on the other one. Cut along the lines with scissors; snip away ragged edges, if there are any. You'll get:
- a reservoir - the bottom part of the bottle you cut at the shoulder;
- a deep funnel - the main part of the bottle you cut at the hip;
- and a shallow funnel - the upper part of the first bottle.
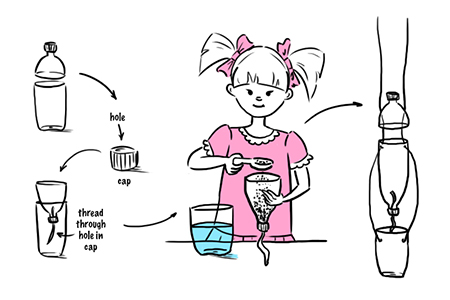
Poke Holes in Caps
Use the woodworking awl to poke a small hole in the center of each bottle cap. Use the tapered reamer to enlarge the holes to 1 cm in diameter.
Place the caps on the bottles.
Thread Wick
Thoroughly wet a wick strip and thread it loosely through the cap on the deep funnel. Invert the funnel and place it into the reservoir so that the wick will reach the bottom.
Fill Chambers
Add water to the bottom chamber of your ecosystem. Add a layer of sand or gravel into the deep funnel, top it with soil and make sure the wick runs up the sand and soil in the middle of the funnel. Plant the seeds.
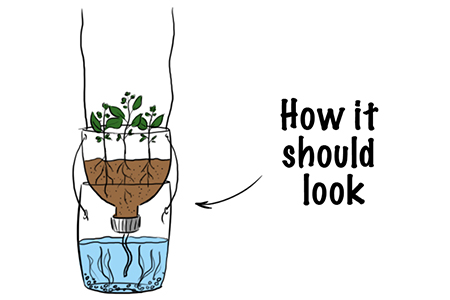
Hang on, Ecosystem
You'll need to hang your future ecosystem up, so find a place where it will fit best of all. Hanging will save table space, prevent your ecosystem from unwanted disturbance and, most importantly, make gravity play in your hands. Use macrame; string or nylon cord to secure the construction.
Poke More Holes
Heat the woodworking awl and use it to make pairs of holes opposite each other on the three chambers (see the picture).
Cut Cord
You will need two 3-ft long pieces of cording or string. Fuse the fibers on the cut ends with heat.
Thread Cord
Tie a knot at the end of each piece of cording and thread it through the holes in the reservoir so that the knots will be on the inside.
Continue threading: from the outside into the inside of the deep funnel; from the inside to the outside of the shallow funnel. Tie the ends together using a square knot and hand the construction up.
Your ecosystem is all set and functioning; you can now start experimenting! Need ideas? Stay tuned for our next article!
A soda bottle combined with simple tools and a handful of dirt can turn into a wonderful way of exploring the world with your kids - a real ecosystem in miniature!
Answer quiz questions to find out your level of intelligence right now!
Answer more questions